Let’s break down how to draw a nose !
Drawing realistic facial features can be a challenging but in this tutorial, we will focus on each step to draw a nose 😀 . So, let’s dive in and start creating!
Materials Needed:
1. Drawing paper
2. Pencil (preferably an HB or 2B)
3. Eraser
4. Optional: Reference images of noses for inspiration
For digital you can use your comfortable set of digital pencil’s
Step 1: Understanding the Basic Structure of a Nose
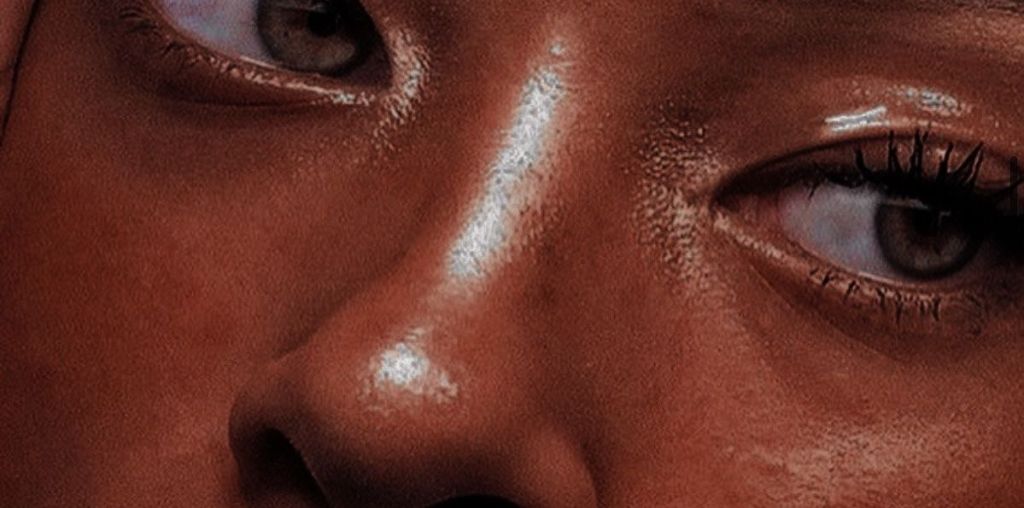
Before we start drawing, it’s essential to grasp the basic structure of a nose. A nose consists of three main parts: the bridge, the nostrils, and the tip. The bridge is the upper part that connects to the forehead, while the nostrils are the openings at the bottom. The tip is the pointed end of the nose.
Step 2: Sketching the Guidelines
Begin by lightly sketching the guidelines for the nose. Draw a vertical line in the center of your paper, representing the nose’s midline. Then, draw a horizontal line intersecting the vertical line, indicating the position and angle of the nose. This guideline will help you maintain symmetry and proportion throughout the drawing.
Step 3: Outlining the Bridge
Starting from the top of the vertical guideline, draw two curved lines that represent the sides of the nose bridge. These lines should follow the shape of the guideline and gradually converge as they approach the tip of the nose. Remember to keep your lines light and loose, as we will refine them later.
Step 4: Shaping the Nostrils
Next, focus on the nostrils. Draw two small, curved lines on each side of the vertical guideline, below the bridge. These lines should be wider at the bottom and taper towards the bridge. The shape of the nostrils can vary, so observe your reference images or experiment with different styles to find what suits your preference.
Step 5: Defining the Tip
Moving towards the tip of the nose, draw a small triangular shape that connects the bridge and the nostrils. This triangle should be narrower at the top and wider at the base. Pay attention to the angle and proportions, as these details greatly influence the overall appearance.
Step 6: Refining the Nose Shape
Now that we have the basic structure in place, it’s time to refine the nose’s shape. Using your initial lines as a guide, darken and smooth out the outline of the bridge, nostrils, and tip. Add subtle curves and contours to make the nose appear more three-dimensional. Remember to keep your strokes light and build up the details gradually.
Step 7: Adding Shadows and Highlights
To create depth and realism, we need to add shading. Observe your reference images or imagine a light source, and determine where the shadows and highlights fall on the nose. Use your pencil to gently shade the areas that are in shadow, such as the sides of the bridge and the underside of the tip. Leave the areas that catch the light, like the bridge’s top and the tip’s upper portion, relatively lighter.
Step 8: Blending and Smoothing
To achieve a more realistic look, blend the shading using a blending stump, cotton swab, or your finger. This will help soften any harsh lines and create a smoother transition between light and shadow. Be gentle while blending to avoid smudging the drawing. This works for digital too 🙂
Step 9: Final Touches and Details
Take a step back and evaluate your drawing. Make any necessary adjustments to ensure the nose looks proportional and realistic. Add any additional details, such as subtle lines to indicate skin texture or small highlights to enhance the shine on the tip. Also some noses have freckles and molds. Remember, less is often more when it comes to details, so keep them subtle and refined.
Congratulations! You have successfully learned how to draw a nose from scratch. Remember, practice takes more practice, so continue honing your skills by drawing various noses from different angles and perspectives. As you become more comfortable, experiment with different styles and techniques to add your unique artistic touch. Keep exploring and enjoy the journey of capturing the beauty of facial features in your drawings!
Be sure to share this tutorial and check out my other tutorials too. Stay tune for a deeper look on how to color a nose. 😀


Pretty
Thank you 😀