Welcome back to another tutorial!!! 😀 Today we’re going to learn how to draw an ear ! This tutorial is designed for beginners and will guide you through the process of drawing an ear in a simple and easy-to-follow way.
Materials Needed :
1. Pencil (HB or 2B is ideal)
2. Eraser
3. Sketchpad or any drawing paper
4. A reference photo of an ear (optional)
5. (Stylish or finger if needed for digital art) tehehe 😀
Step-by-step Guide:
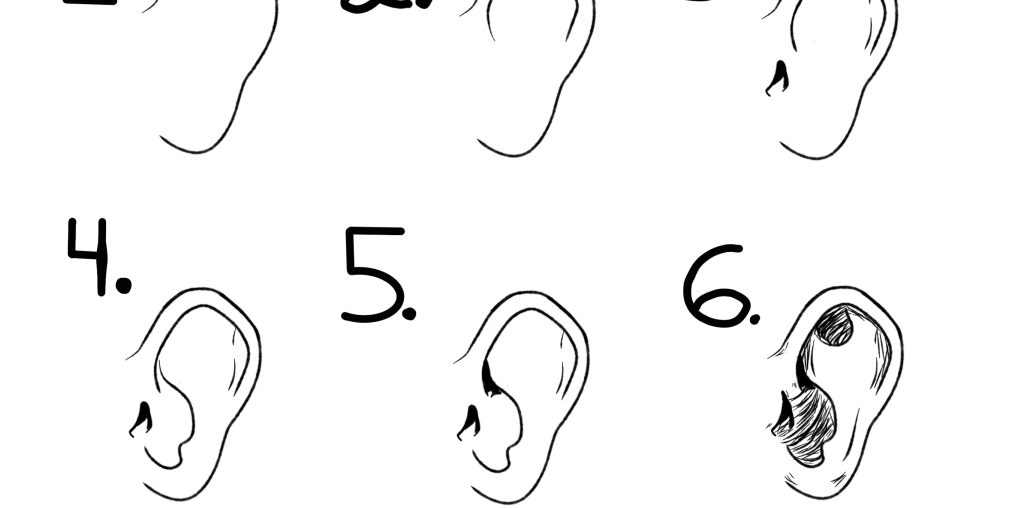
Step 1: Observe and Understand the Basic Shape.
Before you start drawing, take a good look at the reference photo or your own ear in a mirror. Notice that the ear is not just a flat shape, but has depth and contours. The overall shape is like a reversed letter ‘C’.( Also know as a hook)
Step 2: Draw the Outline, Start by lightly sketching the outer shape of the ear. It’s like a slightly tilted oval or an egg shape with the wider part at the top. Don’t worry about getting it perfect at this stage, as you can refine it later.
Step 3: Draw the Inner Structure, Inside the oval, draw a ‘Y’ shape which will form the basic inner structure of the ear. The top part of the ‘Y’ should be a bit curved following the shape of the ear.
Step 4: Add Details, Now, let’s add some details to the ‘Y’. Draw a small bump at the top part of the ‘Y’ which is called the helix. Then, draw a curved line from the bottom of the ‘Y’ upwards, this is the earlobe.
Step 5: Refine the Shape, Look at your reference photo again and refine the shape of the ear. The top of the ear (helix) usually has a folded over appearance. The bottom part (earlobe) is softer and rounder. Use your eraser to correct any parts of the ear that don’t look quite right.
Step 6: Add Shadows and Highlights, The final step is to add shadows and highlights to give the ear a three-dimensional look. Where you place these will depend on your light source. Generally, the inner part of the ear will be darker, while the outer edges will be lighter. You can use the side of your pencil to lightly shade these areas.
Tips:
1. Practice makes practice. Draw ears from different angles and from different people to get a feel for the variety of shapes and sizes. It takes time to draw ears so don’t stress too much if you didn’t get it right the first time 😀
2. Don’t press too hard with your pencil in the early stages. It’s easier to correct mistakes made with lighter lines.
3. Pay attention to the proportions. The length of the ear is usually equal to the distance between the eyebrow and the base of the nose in a portrait. Remember The Hook, “Y”, and Bump of the ear its the main parts you can break down in shapes.
Remember that everyone’s ear is unique, and there is no one-size-fits-all approach to drawing an ear. Use this guide as a starting point, but feel free to explore and add your own creative touches. Be sure to check out my other tutorials and stay tuned for how to color an ear 😀